Sautéed Sichuan String Beans

If you are like me, I feel like 90% of my purchases come from targeted Instagram ads at this point. My favorite thus far being the Sichuan Chili Crisp from FLY BY JING (although I haven’t tried the Momofuku version yet) . I could go on for days how often I use this sauce now, but for the sake of brevity, let’s focus on today’s recipe. Sautéed String Beans are ALWAYS on our Chinese food order, and this is undoubtedly the simplest way to re-create this salty, spicy speciality.

SHOPPING LIST: 1 lb. string beans (snipped ends), Chili Crisp, grapeseed oil, chopped garlic, soy sauce, salt, pepper

Let’s make sure of two things before we begin. Make sure the ends of your string beans are cleaned and that whatever pan you are using has a LID. The key to the perfect string bean is a combination of searing and steaming.

In a bowl, top the clean green beans with 3 heaping tB. of Chili Crisp. Use your hands to really get in and massage the string beans. In a saucepan, get about 1/4 cup of grapeseed oil going over medium high heat. Add 2 tB. of chopped garlic and when your garlic starts to get golden, add all of the green beans, using a spatula to get all of the chili crisp out of the bowl. Once you spread the green beans out in your pan, give them a few minutes to really sit and sear against the pan. Season with salt and pepper and give them another quick toss, again letting the green beans sear for a few more minutes un-interrupted.

Now for the steaming, have your lid ready and add 1/2 cup of soy sauce and quickly cover the pan. Reduce the heat to medium low and allow the string beans to finish cooking the steam for another 7 or so minutes or until the string beans are fork tender.

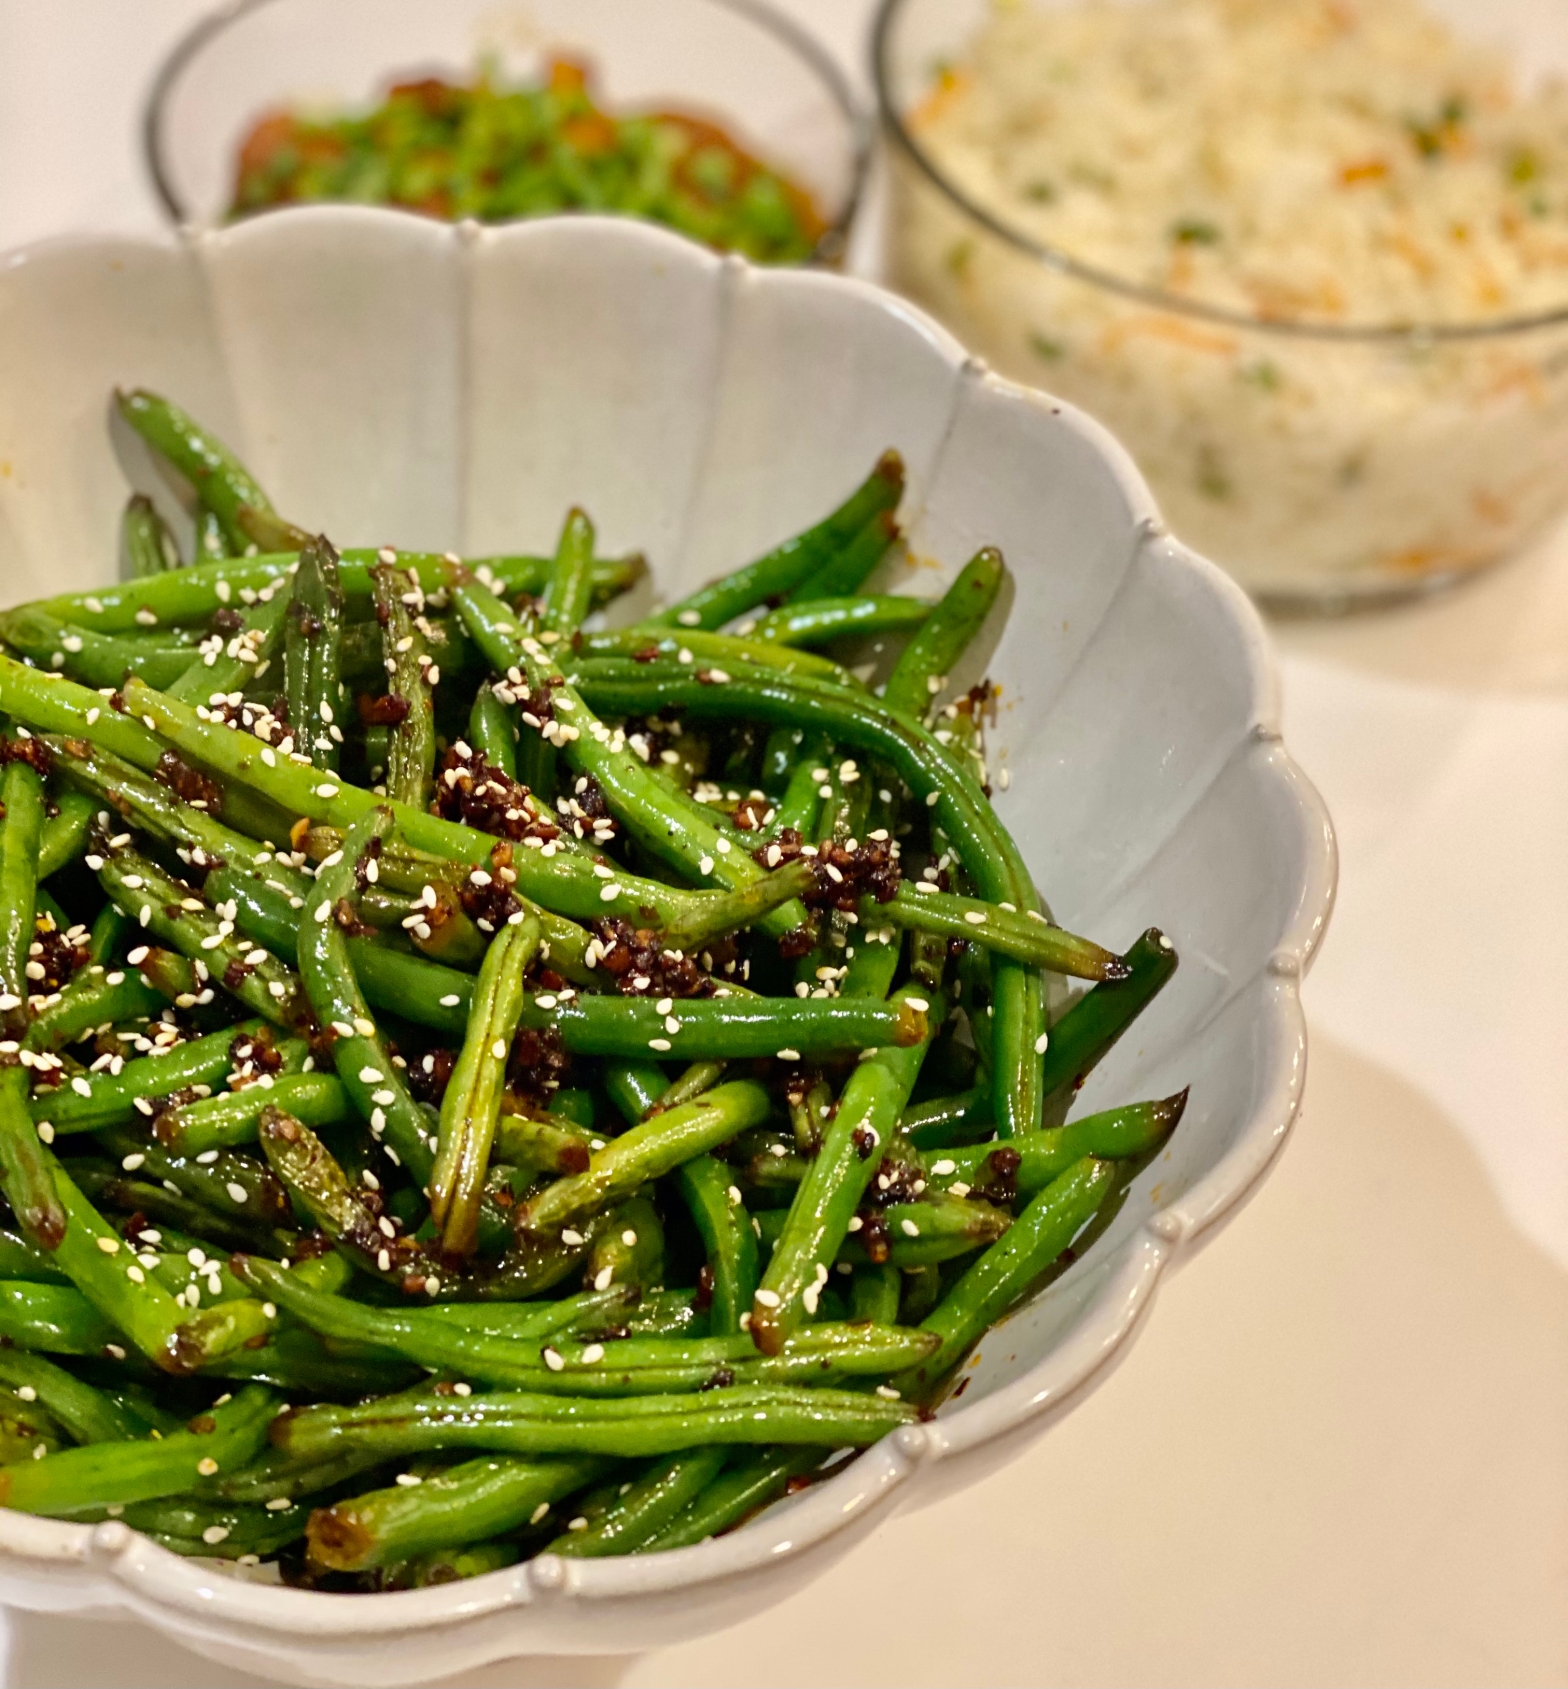
Finish with a sprinkle of sesame seeds. If you prefer your string beans even spicier, you can always add an extra drizzle of Chili Crisp on top.

Roasted Garlic Rack of Lamb

I am so excited about this. I love LAMB CHOPS. Definitely a go-to order for me when I’m out to a nice dinner – and yet, not something I often make at home. Dare I say lamb chops can be intimidating? So when my Father-in-Law showed up with four gorgeously Frenched (ie. trimmed) racks, it was time to put my anxiety aside. Do I slice and grill them individually? Do I roast the entire racks? Do I serve single or double chops? The point is – there are A LOT of ways of doing this – and you just gotta make a decision. So for the sake of brevity, and cooking a LOT of chops with ease, here is a simple recipe to perfectly roast your racks of lamb.

SHOPPING LIST: 2-4 racks of lamb (preferably Frenched), olive oil, garlic, dijon mustard, lime, salt, pepper (SAUCE: sour cream, lime, chopped garlic, scallions, parsley, onion powder)

The first step is going to make our simple garlic marinade. In a food processor, combine 1/2 cup of olive oil with 3 tB. chopped garlic (or 10 cloves of whole garlic), the juice and zest of one lime, 2 tB. of dijon mustard and a pinch of salt and pepper. Pulse the mixture in your food processor until it’s well mixed and all of the garlic is pureed. The mixture will look very similar to a salad dressing (and could be used as such). Also, feel free to have some liberty here – add dried rosemary if you want a more herbaceous marinade, or sub the lime juice for red wine vinegar.

Remove your lamb chops from the packaging and make sure they are patted dry. GENEROUSLY sprinkle salt and pepper onto both sides of your lamb chops, giving them a nice rub to ensure that the seasoning sticks. Next, lay a rack over your baking sheet and display your racks of lamb fat-side up (so the arch of the rib bone is facing DOWN). Smother the tops of each rack in your garlic marinade and allow the marinade to sit for a minimum 1 hour.

When you’re ready, pre-heat your oven to 450 degrees. Roast the racks for 14 minutes. Remove from the oven, use tongs on the actual rib bones to flip the racks and finish roasting for 8 more minutes. Remove the lamb from the oven, flip them back over onto a wooden cutting board so the fleshier side is facing upward and cover with tin foil. Allow the chops to rest for a MINIMUM of 15 minutes.

In the meantime, if you want to make an easy accompaniment, this is what we whipped up in my house: In a small bowl, mix 3/4 cup of sour cream, 1 tB. chopped garlic, the zest and juice of one lime, 2 tB. chopped chives, 1 tB. chopped parsley and 1 tsp. onion powder. Mix well and season with salt and pepper to taste.

When all of the juices have settled into your lamb chops, you can begin to slice them. I chose to do single chops as I was serving them on a large platter but if I was plating the chops for a dinner party I would have preferred double-chops style. The key here is to rotate the chops upwards so the bones are perpendicular to the board, this way you can slice laterally downward through the flesh ensuring that each chop is directly sliced between each bone. I like to finish mine with a very simple sprinkle of sea salt before serving and serve with an extra EMPTY bowl for people to dispose of their lamb bones.
Download

Sunday Morning Frittata

I love hosting. But sometimes on a weekend morning, after a few too many glasses of wine, it’s not so easy to throw together something fabulous. This is where the Sunday Morning Frittata literally saves the day!!! I’m going to give you the exact recipe for the last one I made (pictured above), but let’s understand something I am always trying to convey — USE WHAT YOU GOT!!!! (or what you like)! The frittata is a simple base for any combination of eggs, cheese and vegetables — and is PARTICULARLY delicious when you start with some fried bacon, ham or any type of breakfast meat 🙂 But let’s walk before we run with this beautiful vegetarian variation.

SHOPPING LIST: 10 eggs, white onion, frozen spinach, 2 tomatoes, milk, pesto sauce, olive oil, butter, garlic salt, pepper, shredded mozzarella, grated parmesan cheese

Preheat your oven to 400 degrees. The key to the perfect frittata is non-stick pan or skillet. I have been particularly loving my Zakarian Nonstick Cast Iron Skillet. Heat your skillet over medium heat and then add 2 tB. of olive oil and 2 tB. of butter. In the meantime, slice your white onion in half through the core, and then slice along the grain so you have a large pile of thinly sliced onions to add to your olive oil and melted butter. (In French cooking school, they teach you how to make French Onion Soup – shocking, I know. What I learned from this was 2-part. 1. They always used a blend of olive oil and butter for this purpose and 2. Never go above medium heat. The point is for your onions to slowly caramelize, not burn.) The key to the frittata being excellent is that the vegetables or ingredients that you incorporate within it are properly cooked, and as always, well-seasoned.

Short story: be patient with your onions. When they begin to become translucent, give them a quick season with some garlic salt and black pepper. When they are fully caramelized, you can add 1 cup of frozen spinach. **The only reason I used frozen spinach here is because I had it leftover from the Pancetta-Stuffed Mushrooms recipe** While your spinach is beginning to defrost in the pan, crack 10 eggs into a large bowl. Add 1/4 cup of milk, a hefty pinch of salt, a pinch of pepper and mix well. Next, add 2 cups of shredded mozzarella. (Sometimes I love using cubed FRESH mozzarella instead, or crumbled feta. You could go totally Greek with your frittata, switch it to a red onion, add some dried oregano and kalamata olives with your feta cheese. Once the spinach is nice and wilted into your caramelized onions, add 2 tB. of pesto (any brand of your choice) and really let that pesto melt and get incorporated into your vegetables. Now, increase your skillet to medium-high heat and pour the scrambled egg and cheese mixture directly over the vegetables.

Give the eggs and vegetables a QUICK mix so that the eggs can migrate to the bottom of the skillet and then LEAVE the skillet UN-TOUCHED for 5 minutes over the medium-high heat. Turn back to your cutting board and thinly slice your tomatoes. Lay the slices of tomato over the top of your frittata (I think I fit about 6-7 slices on mine!) and then cover the entire surface with your grated parmesan cheese. Finish with an extra sprinkle of salt and pepper and then pop the skillet into your 400 degree oven for 15 minutes. My favorite part — get a beautiful trivet and present your piping hot frittata directly in the skillet in which it was cooked and a beautiful cake knife for slicing.

Pancetta Stuffed Mushrooms

If the plate is any indication, I whipped up these bad boys to bring to my friend’s Christmas party. I offered to bake a cake for her daughter’s birthday but somehow I got tasked with making her favorite, stuffed mushrooms, as well. Good thing since the cake was a DISASTER (I never said I was a baker). Feel free to omit the pork if that’s not your thing.

SHOPPING LIST: 3 packages button mushrooms (for stuffing), prosciutto, white onion, chopped garlic, frozen spinach (defrosted), 1 egg, thyme, cream cheese, shredded mozzarella, parmesan cheese, olive oil, butter, truffle oil, garlic salt, pepper

Preheat your oven to 400 and then let’s start with the mushrooms – WHICH YOU NEVER WANT TO WASH – so remove the stems, reserve the stems, and then clean your mushrooms with a damp paper towel. Mushrooms are way too absorbent for a rinse in the sink. Once you get your mushrooms prepped, lay them backside-up on your sheet tray, and use a pastry brush to brush olive oil onto the backs of your mushrooms and then season with salt and paper. Flip your mushrooms over and repeat the process so your mushrooms are prepped and seasoned and ready to go! Chop your stems very finely and reserve.

Take 1/2 of your white onion and give it a really nice, fine dice. Because this is a stuffing you really want to make sure your ingredients are all small and uniform so one item doesn’t stand out more than another. Chop an entire package of pancetta into small pieces. Add 1 tB. of olive oil to your saucepan and then fry your chopped pancetta over medium-high heat. When your pancetta is browned and crisp, add 1/4 cup of butter and add 2 tB. of chopped garlic, the diced onion, 2 tB. of chopped thyme. Allow the onions to become translucent and then add 1 cup of your diced mushrooms stems. Once your mushrooms begin to soften, season with garlic salt and pepper. While your mushroom mixture is cooking, take 1 cup of your pre-thawed frozen spinach and give it a rough chop. Add the spinach to the mushrooms and again, season lightly with garlic salt and pepper. When all the liquid is gone from your pan and your vegetables look nice and caramelized, empty your pan into a mixing bowl.

In a cup, mix up one egg with garlic salt and pepper. When I am adding an egg to a dish like this I like to make sure that my egg is seasoned as well – it’s just another way to ensure that your dish is flavorful throughout. Add the seasoned egg to your mixing bowl along with 12 oz. of cream cheese and 1 cup of shredded mozzarella. Mix very well and then you can begin stuffing your mushrooms. I like to use the small soup spoons from my everyday kitchen utensils to do this. I also like to add enough stuffing to each mushroom so they are really piled high and ALMOST over-flowing like the photo above. Once all of your mushrooms are stuffed, I like to give a final drizzle of truffle oil and then top each mushrooms with a generous MEGA-pinch of parmesan cheese. 15 minutes in your 400 degree oven and these stuffed mushrooms are ready for the party!

Lemon + Thyme Shrimp Scampi

This is like one of those dishes where you go to the store specifically for seafood because you want a light dinner but it’s still freezing outside so you want something warm and satisfying and trust me, nothings HITS like a perfectly buttery shrimp scampi. Serve on its own or over a bowl of your favorite pasta (tossed with olive oil and salt, of course), this will take you less than 10 minutes start to finish and that HITS in a whole different way for us procrastinators.

Before I begin, this is SHRIMP SCAMPI people – if you are averse to butter, maybe you should try the Grilled Shrimp + Haloumi Skewers or the Bacon-Wrapped Shrimp with Rosemary Apricot Glaze. Now for the rest of my butter-loving fans, let’s begin.

SHOPPNG LIST: 3 lbs. jumbo shrimp (peeled and deveined), butter, olive oil, dried onion, Adobo seasoning, chopped garlic, thyme, lemon, garlic salt

Toss your cleaned shrimp with 1/4 cup of olive oil and 2 tB. of Adobo seasoning and mix well. In a saucepan over medium heat, add 1/2 cup of butter and 2 tB. of olive oil. Once the butter has melted, add 2 tB. of chopped garlic and 1/4 cup of dried onion (You’ll find the dried onion flakes in the SPICES section of your market. I like the use here instead of FRESH onion because of the texture it creates for the sauce.) Allow the garlic and onion to sauté in the butter for a few minutes along with a handful of thyme springs. *ANOTHER NOTE: I don’t typically love using full branches of HERBS anywhere in my cooking because I think it’s silly; but in this application, the flavor of the thyme will infuse into your butter sauce and the cooked springs actually make for a beautiful presentation.)

Anyway, now you can add all of your shrimp into the simmering butter and garlic and dried onion and thyme. DO NOT mix your shrimp too often. The key to getting a nice caramelized crust on your shrimp is to let the shrimp really INTERFACE with the bottom of your hot sauté pan. Once you notice the bottom of your shrimps turning pink, then you can give them a nice toss with a wooden spoon. At this point in the cooking time, I like to finish the shrimp with a generous sprinkle of garlic salt, the juice of one lemon and an extra tB. of butter for good luck 🙂 Allow the shrimp to continue cooking in the lemon-y scampi sauce until the shrimps are pink all around and firm to the touch. Serve with a few lemon wedges and those beautifully wilted thyme sprigs for effect.

Surf + Turf Saganaki

There’s not enough positive things I can say about Cucina + Amore’s Puttanesca. If you are an olive lover, this tomato sauce is simply the best, briniest, olivey-est of THEM ALL. You can easily finish cooking any par-cooked pasta in this salty sauce for a quick dinner, OR, get a little fancy and follow along for this super simple Surf (shrimp) and Turf (bacon) Saganaki.

SHOPPING LIST: 1 jar Cucina + Amore Puttanesca, 5 strips bacon, 1 lb. shrimp (peeled + deveined), 1 can artichokes, chopped garlic, crumbled feta cheese, Adobo seasoning, red pepper flake, dried parsley

Let’s start by saying that if you can’t find my preferred Puttanesca, any similar sauce will do. If you cannot find anything puttanesca-like, just add 1/2 cup of halved Kalamata olives when frying your bacon and artichokes and then use a marinara of your choice.

Give a quick, thick chop to your 5 strips of bacon and get that into a cold sauté pan (make sure said pan HAS A COVER). Turn the heat onto medium-high and let your bacon begin to sizzle away. In the meantime, toss your cleaned shrimp in Adobo seasoning and set aside. Strain your canned artichokes, slice them in half, and dry them thoroughly with paper towels. When your bacon begins to release its fat and become crispy, add 1 tB. of chopped garlic and your halved artichokes and allow the artichokes to fry in the bacon fat. (This is where you would add your own olives per above). When your artichokes are browned and crispy, add the entire jar of puttanesca (about 1.5 cups) and let it come to a simmer. Use a wooden spoon to help deglaze the bottom of the pan and free all the bacon bits into your tomato sauce.

Add your shrimp and give a quick toss so they are coated in the tomato sauce. Sprinkle parsley flakes, red pepper flakes (optional) and 1 cup of crumbled feta on top and then COVER YOUR PAN so the shrimp can steam in the tomato sauce! It will take about 5-7 minutes over low heat for your shrimp to be firm and cooked through – and just like our original Halibut Saganaki recipe – one of the best parts of this style of cooking is you can serve the dish DIRECTLY in the pan in which it was cooked. We love that over here. We also love sneaking bacon into recipes.

This is the sort of dish you definitely want to serve with some sort of starch to soak up all the goodness. A simple pasta, or garlic bread will do, or you can make a quick Garlic Rice: sauté 1 tB. chopped garlic in 2 tB. olive oil, when the garlic browns add 1 cup of rice and 1 tsp. of salt, sauté for 1 minute, add 2 cups of water and bring to a boil, cover and reduce to a simmer for 13 minutes.

Sheet Pan Sausage + Peppers

BIG sausage and pepper fan over here. Especially when it’s grilling season it’s not only so simple, but then you have a complex meal of protein and vegetables with minimal effort. What’s easier than grilling though? Throwing EVERYTHING on a sheet pan and calling it a day 🙂 Obviously I had to dress it up a little bit, but I promise this will become an easy staple for your family during these dreary winter months.

SHOPPING LIST: 2 lbs. sausage of your choice, 2 packages mini bell peppers, red onion, chopped garlic, crumbled feta cheese, pickled banana peppers, grapeseed oil, Adobo seasoning

Here’s what I have learned about sheet pan dinners: your protein MUST be flush with the bottom of your sheet pan in order for it cook properly! With that said, preheat your oven to 400 degrees trim the ends off of your bell peppers and slice up your red onion and spread them over your sheet pan. Drizzle your veg with grapeseed oil, 2 tB. chopped garlic and a generous amount of Adobo seasoning and mix well. I used about twelve Sweet Italian Chicken Sausages and I just shimmy them in between the vegetables – as mentioned above – to make sure the bottom of the sausages are touching the sheet pan. Finish with a generous handful (or two) of crumbled feta and roasted for 20 minutes.

Remove your sheet pan, flip each sausage over and slice them on the bias. Doing this makes sure that both sides brown evenly, and slicing the sausage at this point releases some of the juices that will soaked up by your veggies. Finish cooking another 10 minutes or until your sausages are firm and cooked through. The FINAL TOUCH?!?! Top your sheet pan Sausage + Peppers with a bunch of pickled banana peppers – the briny peppers are the perfect compliment to the sweet bell peppers and the fatty sausage. That’s all she wrote!

Chipotle Lime Chicken Fajitas

Sometimes you just need a quick, FLAVORFUL dinner that will satisfy all the senses (AND require minimal clean-up). Fajitas are fajitas – I get it – but like any age old dish there are ways to make it your own. My family LOVES the Frontera Fajita Skillet Sauce with Chipotle and Lime because it really smothers the natural flavors of the peppers, onions and chicken in a smokey yet subtly tart sauce that keeps you coming back for more. My other trick? Spicing up the peppers (literally) by using a mix of bell and HOT peppers.

SHOPPING LIST: 1 lb. boneless/skinless chicken breast, red onion, green bell pepper, red bell pepper, 2 long hots, 1 jalapeño, 1 package Frontera Fajita Skillet Sauce, chopped garlic, olive oil, salt, pepper, tortillas (of choice), sour cream, shredded Mexican cheese or cotija

I like to prep my vegetables first so I only have to dirty one cutting board. Slice up your entire red onion. In you skillet, warm 2 tB. of olive oil over medium high heat. Add 2 tB. of chopped garlic and your sliced red onion and get that going. As always, we like to season along the way, so make sure to season your onion and garlic with salt and pepper. While those are starting to sauté, slice up your peppers. Cut the ends off each pepper. For the bell peppers, make sure to remove the seeds and trim the white-tish part from the center. Slice your bell peppers linearly, but for your HOT peps – the long hots and and the jalapeño – I like to slice them horizontally WITH the seeds.

Add all of your peppers into the skillet with the onions and garlic and mix well. Allow the peppers to cook about 5 minutes or so. I don’t like my peppers to be TOO soft but if you like a super cooked pepper with no bite then sauté them for double that amount of time. Now that you’ve added your peppers, season again with salt and pepper.

While your peppers are cooking, slice the chicken breasts into strips. (Let’s also quickly reference here that you could use SHRIMP, or TOFU, or STEAK, etc. if your heart desires.) Reserve your cooked peppers and onions in a bowl and then add another 2 tB. of oil to your hot skillet. Add your sliced chicken and give it a minute to brown before moving with your wooden spoon. Once you get a nice sear, give you chicken a toss, then season your chicken with salt and pepper. Let it cook another 2 minutes or so in order to nicely sear another surface of your chicken strips. When your chicken is par-cooked, re-add your sautéed vegetables and top the entire mixture with the full package of your Frontera Fajita Sauce. Turn your heat down to medium-low and allow the chicken to finish cooking in the fajita sauce for about 8-10 minutes (your sauce should be simmering the entire time).

THE BEST PART? You get to serve this dish DIRECTLY in the skillet in which you cooked it it in. Love that. I served mine with sour cream, shredded Mexican cheese and homemade tortillas which are not photographed because it was my first time trying this at home and now I understand why I need a tortilla press (Thank you, Amazon!). I’ve got a lifetime supply of Maseca here now so sooner or later we’ll talk fresh tortillas on the blog — or even pupusas — so stay tuned!

Chinese Cashew Chicken

Last night I did a LIVE cooking demo for my husband’s company, New Frontiers. The first time we did this I demo-ed my favorite, Spaghetti Carbonara. This time we went Asian with it because honestly, there is NO good Chinese food out here in The Hamptons (please please please feel free to correct me if you know something I don’t). The Prince LOVES Chinese so I’ve really been trying to work on my Asian-inspired cooking. Honestly, if you’re craving Chinese flavors, this hits the spot AND won’t make you sick the next day 🙂

SHOPPING LIST: 1 lb. chicken breasts, 1 cup cashews, soy sauce, hoisin sauce, creamy peanut butter, sesame oil, sriracha, rice wine vinegar, salt pepper, grapeseed oil

Dice your chicken or use a kitchen shears to cut your chicken into small 1-inch pieces. In a small bowl, toss your chicken with 1/4 cup of soy sauce. When cooking Asian-style chicken, I always like to toss my proteins in a little soy sauce before cooking because I find the chicken absorbs the flavors much better when it’s raw.

In a small pot, add 1/3 cup of soy sauce, 3 tB. of peanut butter, 2 tB. of hoisin sauce, 2 tB. of sesame oil, 2 tB. of rice wine vinegar and a dash of sriracha (or more if you like it spicy). Let the mixture come to a boil so the peanut butter melts and the sauce is incorporated and then allow it to simmer. Season your sauce with salt and pepper to taste and allow it to thicken while you cook your chicken.

In a hot pan, add 1/4 cup of oil of grapeseed oil over medium-high heat. Begin to saute your chicken cubes in the hot oil, allowing them to get a good sear on one side before beginning to mix them around. Once your chicken begins to brown, you can give it a nice toss and then season with salt and pepper. Allow your chicken to cook another couple minutes without touching so it continues to get a nice sear and then add your sauce to the chicken mixture (just enough so that it coats the chicken – you may NOT need to use all of your sauce, so pour slowly). Allow the chicken to finish cooking in the sauce. Finally, add 1 cup of cashews and mix well so that cashews are evenly coated with your peanut sauce as well. 

We like to serve this with plain white rice in my house. However, last night I realized that the leftover peanut sauce – mixed with a little HOT chili oil – would have made for a killer sesame noodles if I had Lo Mein noodles on hand. Next time!

Cacio e Pepe Kugel

I went there and I ain’t ever going back. To be honest, I’ve never really been a fan of a sweet noodle kugel, so it was time to amend tradition to the likes of my family and myself and BOY OH BOY is this a winner. Also, SUPER easy to make, so I’m typing up this bad boy on the eve of the 2nd night of Rosh Hashanah since you still have time to REALLY impress your friends and family this evening.

SHOPPING LIST: 2 packages egg noodles, butter, parmesan cheese, cottage cheese, sour cream, 2 eggs, olive oil, salt, black pepper

As always with any casserole, brush your glass baking dish with olive oil and pop in your oven while it is pre-heating to 375 degrees so your dish can get hot while you are prepping your kugel. This will ensure that your kugel has a crisp bottom and sides!

In heavy salted boiling water, par-cook your egg noodles (about 5 minutes). Toss your noodles in olive oil after straining so they don’t stick together.

In a large bowl, crack and beat two large eggs. Add 16 oz. of cottage cheese, 4 tB. of sour cream, 1 tB. of FRESHLY CRACKED black pepper, 1 tsp. salt, and 1 cup of grated parmesan cheese. When the mixture is incorporated, add 1/2 cup of melted butter. Finally, add your par-cooked egg noodles, mix well and then dump the entire kugel mixture into your piping hot baking dish.

Finish with a generous layer of parmesan cheese (maybe another 1/2 cup), another tsp. of black pepper and a sprinkle of salt. Bake at 370 for 25 minutes, making sure to turn the baking dish so the top of your kugel browns evenly. THE CRISPY NOODLES ARE EVERYTHING. (Like I do with pizza, AND because honey is so fitting with the Jewish New Year, I would highly encourage you to enjoy this insane cacio e pepe kugel with a drizzle of honey and a sprinkle of red pepper flake).

This might be the first dish I’ve ever invented for the Jewish holiday that might become a staple in my house all-year-round. It’s literally like an extra crispy white baked ziti. Whatever it is, there wasn’t a bite left (that may or may not have been my doing). Enjoy and Happy New Year to all those who celebrate.