Crispy Lemongrass Tofu

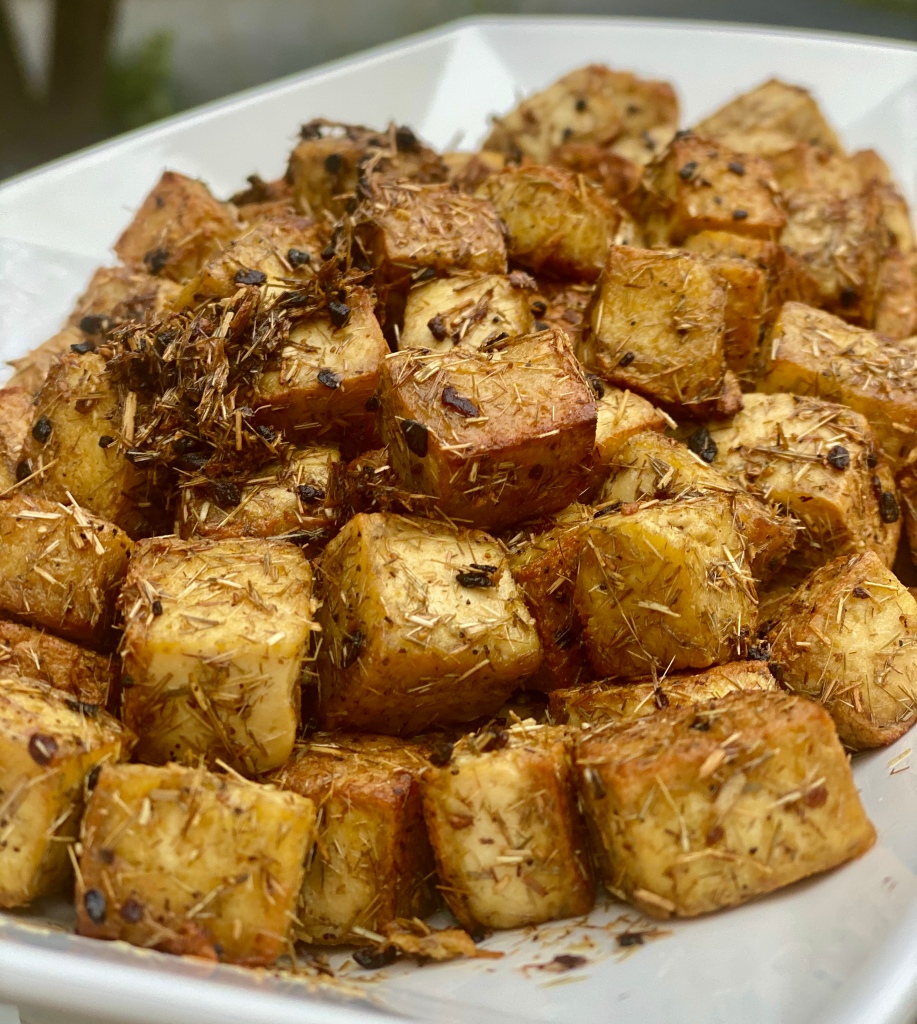
If you did NOT try my Vietnamese Lemongrass Chicken, do yourself a favor and check it out 🙂 If you aren’t into chicken, or you are looking for a simpler recipe with a similar flavor profile, this tofu recipe is everything. When the Prince and I traveled through Vietnam, we literally looked to eat as many plates of crispy tofu as we could. I think it’s best when it has the lemongrass bits, although plain Jane over here could go either way. The OMG moment I had when developing this recipe (because I first tried it with extra firm tofu) is that Nasoya SUPER FIRM tofu EXISTS and that is exactly what you need for this dish.

SHOPPING LIST: 2 packages super firm tofu, grapeseed oil, soy sauce, chopped garlic, fresh chopped ginger, dried lemongrass, salt, pepper

I’m going to link here a similar version of the lemongrass I used because you want to make sure you are using a FINELY cut product like THIS. Lemongrass isn’t always the easiest thing to find fresh so using a dry product allows us to get the same result with an ingredient that is accessible to most everyone.

The BEST part of this super firm tofu is it doesn’t require all the work of pressing out the excess liquid like other tofus do. So first, open your two tofu packages. You are going to turn each tofu cube on it’s side and make 2 equal horizontal slices so you end up with 3 flat tofu pieces. Keep the tofu stacked on top of one another, flip it onto the un-cut surface, then make 3 slices in one direction, and then 3 equal slices in the other direction (so each slice of tofu renders 16 cubes). Repeat this process on both cubes and then lightly pat try all of your tofu cubes with a paper towel. Throw your tofu cubes in a bowl and top with 1/2 cup of soy sauce. Allow the tofu to marinade for 20 minutes, tossing frequently, and then pat try again after the tofu has absorbed the soy flavor.

In a skillet or saucepan, heat 1/2 cup of grapeseed oil over medium-high heat. Add 2 heaping tB. of chopped garlic, 2 tB. of chopped garlic and 1/3 cup of dried lemongrass. SautĂ© until the garlic begins to get some color. Next, add all of your tofu cubes and give them a quick toss to marry with the garlic and lemongrass. Then, STEP AWAY, and allow the tofu cubes to brown for 3-4 minutes before tossing again. When trying to get things crispy, it’s important to allow the surface area of whatever you are browning to really CONNECT with the surface area of your hot pan/hot oil to give it time to brown thoroughly. This is a very simple dish, but the KEY is to ensure you achieve that crispy TEXTURE! After your tofu gets it’s initial sear, you can begin to move your cubes around in the oil with a wooden spoon, ensuring that every side of cube has the opportunity to brown. Season your tofu with a GENEROUS amount of salt and pepper – TOFU is notoriously bland, so I would go as far as a full tsp. of each. Last note, TOFU IS ABSORBENT – so if your oil runs dry (like mine did) add an extra 1/4 cup to continue frying your tofu until it’s golden brown all sides!

Finish with an extra sprinkle of salt before serving. I like to serve mine with Sweet Chili Sauce – because WHY NOT? it’s store-bought and delicious – but you could also serve this dish with an easy soy dipping sauce: 1/2 cup soy sauce, 2 tB. chopped scallions, 1/2 tsp. sugar, 2 tsp. sesame oil and 2 tsp. of rice wine vinegar.

SPICY Lobster Vodka Pasta

What says Saturday night like vodka and pasta?! Sounds like a party to me! While I’m always singing the praises of using your favorite store-bought products to make life easier, this vodka sauce is from SCRATCH and it actually makes a world of difference. As always, feel free to omit the lobster if it’s not for you. Last note, the pasta shape here is called “GEMELLI.” My brother’s girlfriend is a pasta enthusiast, so we’ve spent the summer uncovering loads of new noodle shapes and we gotta say, the tight twist of these short noodles gives them the PERFECT chew (if you cook them right, of course – which you will because you will follow these directions and everything will be perfect – or you didn’t get the recipe from me)

SHOPPING LIST: 1 lb. pasta (gemelli, preferred), 1 lb. lobster meat, tomato paste, chopped garlic, vodka, heavy cream, olive oil, butter, parmesan cheese, red pepper flakes, salt, pepper

You are going to get two pots going. One sauce pot with heavily salted water to par-cook your pasta and another wider sauce pan for your vodka sauce. As usual, I like to use the larger saucepans with the higher, flat sides so we have room to finish cooking our pasta in the sauce.

In your saucepan, you are going to heat 2 tB. of olive oil over medium heat. Add 2 tB. of chopped garlic and sautĂ© until translucent. (If you want to add 1/2 cup of chopped onions here, GO FOR IT! You know by now the Prince still picks onions out of his food so we opted out). Next, add 1/2 a tube of tomato paste (about 1/2 cup), and sautĂ© for another 3-4 minutes. Deglaze your pan with 3/4 cup of vodka (BE CAREFUL! IT MIGHT FLARE UP! THAT’S OK!) and allow the vodka to cook down for 5 minutes to burn off the alcohol. Finally, add 1 cup of heavy cream and allow your sauce to simmer. Add 2 heaping tB. of red pepper flakes and season with salt and pepper to taste. SPICY is in bold for a reason, so if you don’t want your sauce to have a serious kick, use less pepper flakes.

Allow your gemelli (or whatever pasta you choose) to boil for about 8 minutes, or until it still has a firm chew in the middle. Before you strain your pasta, add 1/4 cup of your pasta water to your vodka sauce and allow your sauce to continue to simmer. Add 1/4 cup of butter and 1/2 cup of grated parmesan cheese to your sauce and top with all of your steaming hot pasta to help melt the butter and Parm. Using a wooden spoon, mix well until the sauce is incorporated into the noodles. Then add 1 lb. of your roughly chopped lobster meat and mix again. I bought my lobster at my local seafood store, but you could always boil 6-8 lobster tails (fresh or frozen) in salted water if you can’t find fresh picked lobster meat and remove it yourself. Continue cooking your pasta in your simmering vodka sauce until your noodle has gotten to the perfect consistency and then serve immediately. As my Father-in-Law likes to say, “hot food’s hot!”

Jerk Halibut with Peach Salsa

In honor of me being back at home, back to focusing on cooking and writing, we’ll kick it back off with a little two-fer — everyone’s favorite! On one of my first trips to Jamaica I brought home Grace’s Jerk Seasoning to try to bring a little bit of Scotchie’s back to NYC. This stuff is SERIOUSLY hot so I like to balance it with a bit of coconut milk and serve whatever marinated protein (in this case, halibut) with a heaping helping of a fruit-forward salsa. Let’s do it!

SHOPPING LIST: 2 lbs. halibut, Grace’s Jerk Seasoning, 1 can coconut milk, 1 peach, 1 tomato, 1 jalapeño, 1 lime, adobo seasoning, salt, black pepper

The first thing you are going to do is marinate your fish. Slice your halibut into individual servings, about 2×2 inches, and season both sides of the fish with your classic adobo. In a bowl, combine 4 tB. of Grace’s Jerk Seasoning with 1/2 cup of coconut milk (make sure to shake the can before opening). Pour the seasoning over your fish and mix well in a bowl, or you can add your fish and marinade to a large ziplock and massage it gently. Allow the fish to marinate 30 minutes or so.

In the meantime, let’s get to that salsa. Chop up one large peach and one large tomato into even cubes. If you can find a YELLOW tomato I actually love that for this salsa for the uniformity in color. Combine the chopped peach and tomato in a SMALL STRAINER and then dice 1/2 a fresh jalapeño VERY finely. (This is one of those recipes that could totally have 1/4 of a diced red onion as well but the prince doesn’t love onion I didn’t include it this time). Add your jalapeño to the salsa and season with salt and pepper. Mix well and then allow the strainer to sit over the sink for 10 minutes because the salt will draw liquid from your fruit and vegetables and you want to get rid of this excess liquid. After the ten minutes, put your simple salsa in a serving bowl and finish the zest and juice of one lime. Mix the lime in and you’re good to go.

Now get your BBQ nice and hot and you’re going to grill your fish until its fork tender and almost falling apart. That’s what I love about halibut – you can easily tell when it’s perfectly don’t when the ends beautifully flake off. The fish is going to take about 4 minutes on each side. The key for me is to keep lathering the fish in the excess marinade while it’s cooking. The more the merrier. Serve up your freshly grilled halibut with your beautiful peach salsa and let the combination of sweet and spicy flavor your evening.

Grilled Cabbage + Avocado Caesar

By now you probably know I love cabbage – I wrote an Ode to Cabbage, gave cabbage the Cacio e Pepe treatment, braised it in peanut butter, and created a bunch of slaws like this and this. I’m always shocked when people come over and have never thought to throw their cabbage on the grill before – it’s one of my favorite summer hacks – but it was time to step it up a notch, or two!!!!! The combo of the grilled cabbage, and the melt-in-your-mouth grilled avocado, is a certified winner!

SHOPPING LIST: 1 head green cabbage, 2 ripe avocados, Caesar dressing, shaved parmesan cheese, coconut oil, salt, pepper, onion powder

The first thing we are going to do is slice the end off the cabbage and remove any outer dirty leaves. Then, slice your cabbage into thick-cut steaks. Brush both sides of the cabbage with coconut oil and season both sides with salt, pepper, onion powder. Slice your avocados in half, remove the pits, and then rub the avocado flesh with coconut oil and season again with salt and pepper. On your outdoor barbecue, grill your cabbage steaks until they are nice and charred on both sides – about 5 minutes on each side. When you flip the cabbage steaks, throw on your avocado, flesh-side-down, and allow the avocado to grill for 3-5 minutes until it has beautiful char marks. Bring your grilled vegetables inside and place the cabbage steaks on a cutting board and give them a rough chop.

Place the chopped, grilled cabbage on your serving dish and then use a spoon to remove the flesh of the halved avocado in one piece. Slice the avocado halves into three equal pieces and then evenly distribute the charred avocado slices on top of your bed of grilled cabbage. Finish with a GENEROUS drizzle of homemade Caesar OR your favorite store-bought dressing (I love the Primal Kitchen version). Final touch – disperse a handful of SHREDDED parmesan and that’s all she wrote. Honestly, I have never grilled avocado before – and this is simply too good to be true. Throw some grilled shrimp or chicken on this and you could have an ENTIRE meal on one platter.

Macaroni Pie

In college my friend used to whip up his famous “macaroni and cheese” using milk, American cheese and angel hair pasta. So simple yet so satisfying. This is sort of an homage to that, but more so it’s just an interesting way of serving a spaghetti side-dish in a unique, sliced manner. I put my French cooking education to work here – making a quick bĂ©chamel to really help bind the pasta and keep each bite creamy and delicious.

SHOPPING LIST: 1 box angel hair pasta, 1 stick unsalted butter, 2 eggs, AP flour, milk, American cheese, shredded mozzarella, parmesan cheese, ground mustard, nutmeg, salt, pepper

First, wipe your skillet with olive oil and throw it into a 375 degree oven to pre-heat while you’re prepping. Since we are using a long pasta, I actually like to boil the pasta water in a wide, shallow saucepan. (You can totally use 2 pots for this and cook your pasta + prepare you sauce simultaneously but for the ease of filling your sink with dishes I am going to explain this a 2-part process.)

Especially since this is a BAKED pasta recipe, we are going to make sure to UNDERCOOK our angel hair – no more than 6 minutes!! Strain your al dente angel hair (reserving a 1/2 cup of pasta water JUST in case) and immediately give it a toss in about 1/2 cup of olive oil to ensure the strands don’t stick together. I like to use tongs to mix the pasta with the olive oil to really make sure that your strands are well-coated.

Once your pasta is strained, you can give the same pot a quick cleaning and use it for your bĂ©chamel. Melt the entire stick of butter over medium heat. When your butter is totally melted, add 1/2 cup of flour and whisk well. Bring the heat to medium-high and allow your roux to begin to bubble and cook. I like to cook my roux for about 90 seconds. Add 4 cups of milk and continue whisking. Your milk will begin to thicken into a beautiful cream sauce – your basic bĂ©chamel. Turn your heat down to low and add 1/2 cup of shredded mozzarella and 4 slices of American cheese (I just rip the cheese with my hands). Season your bĂ©chamel with 1 tsp. ground mustard, 1 tsp. black better, 1/2 tsp. nutmeg and 1 tB. salt. (If your cheese sauce is getting a bit too thick, you can always thin it out with some of your pasta water.)

Add your pasta directly into your cheese sauce and mix thoroughly. Give both eggs a quick mix in a cup and then add them directly directly into the pasta mixture, using your same tongs to really incorporate everything. After the egg is mixed in, remove your hot skillet from the oven and add the pasta directly into your hot skillet, using a spatula to flatten the top. Finish with 1/2 cup of parmesan cheese and a final sprinkle of salt and pepper.

Bake your Macaroni Pie in the oven for 18 minutes (rotating half-way through) or until the parmesan is starting to brown and bubble. ALLOW the pie to cool! If you serve this too hot, you won’t be able to cut perfect slices of macaroni pie. This is an awesome dish to bring to other people’s houses because it presents really beautifully and can be re-heated quickly and easily since it’s served in the cooking dish. The only problem about bringing it to someone else’s house (as I learned this weekend) is then you don’t have the leftovers. Oh, the things I would have done with that Macaroni Pie.

Grilled Zucchini Salad

I know what you’re thinking: SHE DID IT! Sure did. Found a delicious and simple way to serve up all that zucchini from your garden. DISCLAIMER: I think I killed my garden after the first couple harvests so this zucchini is actually from a friend’s garden but the funny thing about gardening is like – you could just let your friend do it for you – the zucchini tastes the same no matter who grows it. Ha!

SHOPPING LIST: 3 zucchini, 1 lemon, ricotta salata, hazlenuts, chopped garlic, olive oil, truffle oil, garlic salt, pepper

Thinly slice your zucchini LENGTHWISE so you have long, thin zucchini ribbons. In a small bowl, combine 1 cup of olive oil with 2 tB. of truffle oil and 2 tB. of chopped garlic. Mix well and use a pastry brush to smother your zucchini ribbons in your homemade garlic-truffle oil. Sprinkle each side of the zucchini with garlic salt and pepper. Give them a QUICK grill – about 2/3 minutes per side – you want LIGHT grill marks so you’re zucchini ribbons are soft and pliable.

Pile your grilled zucchini ribbons on your serving plate. Freshly grate 1/2 cup of ricotta salata directly over the zucchini and top with 1/3 cup of chopped macadamia nuts (or toasted pine nuts or hazelnuts would work well here too). Finish with the zest and juice of one lemon to brighten all of the flavors. A sprinkle of red pepper flake would also be a nice finishing touch here – pulling double duty with a splash of HEAT and COLOR!

Ginger Scallion Cauliflower

If you follow my instagram @TheGluttoness you’ll know a couple of things – I have been addicted to my own Ginger Scallion Sauce and I’m always looking for an easy way to spice up my family’s favorite – roasted cauliflower. **Granted, I usually keep a plate of plain roasted cauliflower for the kids before I take a quick detour to flavortown**

SHOPPING LIST: 3 heads cauliflower, 1 bunch of scallions, ginger knob, chopped garlic, jalapeno (optional), lime, olive oil, coconut oil, sesame oil, salt, pepper, garlic power, ginger powder

You know how this goes. Preheat your oven to 400 degrees, using the convection function if you have that option. Remove the florets from your cauliflower and lay on a sheet pan. Drizzle with melted coconut oil and season with salt, pepper, garlic powder. Toss well so all of the florets are equally coated in oil and seasoning and bake for 40 minutes. 

While your cauliflower is cooking, mix up a batch of your Ginger Scallion Sauce. Drizzle 4-5 tB. of your Ginger Scallion Sauce over your cauliflower and finish under the broiler for 5 minutes. Give the cauliflower another 5 minutes to cool after removing from the oven – I find that allowing the cauliflower to cool gives it a minute to “set” whereas sometimes the florets are too soft to move right out of the oven. Finish with an extra drizzle of your sauce, because WHY NOT!!!!!!! and then instantly question why people eat plain roasted cauliflower in the first place.

Macadamia Nut Pesto

Remember that incredible Blackberry Salad with the macadamia nuts?! Well I had some leftover macadamias and the ONLY good thing my house renters did was leave me a ton of fresh basil so it only seemed natural to riff on a classic pesto (which usually has pine nuts).

SHOPPING LIST: fresh basil, macadamia nuts, chopped garlic, parmesan cheese, olive oil, lemon, salt, pepper

Give you fresh basil a quick rinse and dry and then you want to get about 2 cups of basil leaves into your food processor. Top the clean basil leaves with 1/2 cup of macadamia nuts, 3/4 cup of parmesan cheese, 2 heaping tB. of chopped garlic and the juice of one lemon. Lastly, add 1/2 cup of olive oil and begin to pulse your food processor until your pesto becomes chunky and emulsified. If your pesto needs more liquid, add 1 tB. of olive oil at a time until it’s easily blended. Finally, add two pinches of salt and one pinch of black pepper and give it one last pulse to blend the seasonings. Your finished pesto should like so:

Now for your pasta. We’re really big fans of the Anna Long Fusilli pasta these days but you can use ANY pasta of your choice. Regardless of noodle, there are a few keys steps to really making this dish perfectly. First of all, make sure you are cooking your pasta in HEAVILY salted boiling water. You want to par-cook your pasta – for this dish I cooked the pasta for 11/12 minutes – and then retain 1/2 cup of the pasta liquid before straining your pasta.

To finish your pesto pasta, add 2 tB. of olive oil (or even butter) to a saucepan with the 1/2 cup of pasta water and 3/4 cup of your pesto sauce and heat over medium heat. The pasta water and oil will loosen your pesto and create a creamier sauce. Re-add your pasta to the pan and continue to cook the pasta 2 minutes in the pesto sauce. Finishing your pasta this way will allow the pasta to really soak in and absorb all of the flavors of the pesto. Give the dish and another pinch of salt and pepper and quick toss before serving. A little red pepper flake would be a nice touch here if you’re cooking for people who like things to have a kick (like me).

** Side Note ** I also love thinning out this pesto recipe – 1/2 cup of pesto with 2 tB. of apple cider vinegar – to create a pesto vinaigrette to use as a dressing for salads or grilled vegetables.

Bacon-Wrapped Shrimp with Rosemary Apricot Glaze

I know the name is a mouth-full but this gorgeous dish is actually super simple to execute. It’s got everything you want – the sweet, the salty, the crunchy, the supple shrimp and that herbaceous rosemary finish just brings it all home. Also, I’m just *really* having a moment with dried rosemary – my Fig + Rosemary “Baked” Brie has also been on repeat – I just love the earthiness it brings to these fruit-foward dishes.

SHOPPING LIST: 2 lbs. shrimp (peeled, de-vained, tails on), 1 package of bacon, apricot preserves, balsamic vinegar, dried rosemary, olive oil, salt, black pepper

Toss your shrimp with a few tB. of olive oil, salt and pepper so that they are well-oiled and seasoned. Always remember anytime you’re cooking, you want to season EVERY step of the way! Take your package of bacon and lay it flat on your cutting board. Cut the entire package in half so you each strip of bacon is now 2 shorter strips. Wrap each shrimp in a half strip of bacon, starting from the tail and wrapping the entirety of the mollusk. The bacon will be somewhat tacky and stick together if you wrap tightly enough.

While your BBQ is heating up, get an ALL METAL saucepan that you can put directly on your grill (you can TOTALLY do this step inside I just find it’s quite easy to do it together). Add 1 cup of apricot preserves, 2 tB. of balsamic vinegar, 2 heaping tB. of dried rosemary, a pinch of salt and black pepper. Place the metal saucepan directly on your BBQ so the apricot preserves can begin to melt into a glaze. Place your bacon-wrapped shrimp on the BBQ. Once your preserves melt, use a pastry brush to add the glaze to the bacon wrapped shrimp. Cook about 5 minutes and then flip your shrimp and continue with another coat of glaze. (If at any point your glaze is getting too hot or reduced, place an oven mit over the handle of your saucepan and remove from the heat). Cook for another 5 minutes or so and then give a final flip and a third coat of glaze. Because the shrimp is wrapped in the bacon, don’t worry so much about over-cooking them because it will take a bit longer for the heat to permeate through the bacon and thoroughly cook the shrimp. Remove the shrimp from the BBQ and finish with any remaining glaze.

Garlic Parmesan Zucchini Rounds

My first harvest. MAJOR! I planted these soup to nuts – built the garden, lugged the soil, planted the seeds, forgot to label them, wondered what I had planted and then basically hoped for the best. So to come back to a dozen GIGANTIC zucchini felt like such an accomplishment and thus here is a simple zucchini recipe. I feel like some people may refer to this type of recipe as “CHIPS” but honestly, chips are deep-fried potatoes lets not get ahead of ourselves.

SHOPPING LIST: 4 zucchini, parmesan cheese, olive oil, chopped garlic, salt, pepper, red pepper flake, garlic powder

The first step is to thinly slice your zucchini into rounds. It turns out zucchini and cucumbers not only look alike – they have similar water content – so in order for your zucchini to not end up water logged you MUST salt your zucchini rounds and let them sit in a strainer for a least an hour. I even like to wipe the extra water off the zucchini using a paper towel before moving forward. DO NOT skip this step!

Preheat your oven to 450 degrees. Lay your zucchini rounds on a rack over a baking sheet. (Again, using the rack OVER the baking sheet will allow the zucchini to continue to omit excess water.) In a bowl, mix together 1 cup of olive oil with 2 heaping tB of chopped garlic. Using a pastry brush, brush all of the zucchini rounds with the garlic-oil mixture, and then season with salt and pepper. REPEAT on both sides, making sure especially on the second side that you get all of those little bits of garlic on top of the zucchini. Finish your zucchini with about 1 tsp. of parmesan cheese PER round – you want them covered!!!!! And then a final sprinkle of garlic powder and red pepper flakes for additional spice and flavor.

Roast your zucchini rounds for 12 minutes and then BROIL for the final 5 minutes until the tops of your zucchini rounds are browned and bubbly. ALLOW the zucchini to cool so that the bubbly parmesan can set before serving. Anyways, like an influencer who gets married and warns “wedding spam coming soon” that’s basically going to be me with new zucchini recipes, 90 percent of which will probably include cheese.